Meet Me at Camera Three
 The moment has arrived! I’ve officially gone live with my new medical school blog The Green Stethoscope. I invite all of you to check out the new site. I’ll be trying to post recipes when I can (at least once a month). But medical school, as I am finding, is pretty time consuming. I’ll be posting whenever I get the chance. I hope you enjoy poking around the new site. And all of the recipes here on Cooking Between Classes will still be available (and easy to scroll through in the Recipe Index).
Hope you enjoy my new blog. And happy cooking!
Construction
I just wanted to give an update to anyone stopping by my site explaining why I have been so remiss for the past few weeks. Last week I began medical school, which as some of you may have already guessed, is somewhat time consuming. This is not to say that I have given up this whole blogging thing and you’re all on your own for recipes in the future. There will be more recipes. I promise.
However, the other reason I have not been posting here is because I am in the process of designing a new blog dedicated to my life as a medical student and my career aspirations. This new blog will include recipes to illustrate that, yes, med students have time to cook meals too (or at least, I sincerely hope they do). Keep an eye out in the next week or two for a link to my new blog where you can get your favorite recipes AND my personal ramblings on what my life is like.
In the meantime, I have a deliciously time-saving suggestion. Before summer is really done and gone, go out and get yourself a watermelon from your local farmers’ market (or grocery store). Rather than having to awkwardly slice off wedges every time you want a piece and wrapping the rest in plastic wrap, slice it up into cubes first thing when you get home. Then, when you want watermelon, it’s waiting in your fridge, no muss no fuss. My preferred method is to cut the watermelon in half and then cut it into about 1-inch thick rings. I then use my knife to cut the middle of that slice out of the rind in a circle and chop the circle into roughly cubed pieces. It’s a messy undertaking, but then you only have to do it once. Maybe you’ve all thought of this already, but it has revolutionized my summer.
Anyways, sorry again for the posting drought and check back soon for a link to the new blog!
Mediterranean Stir Fry
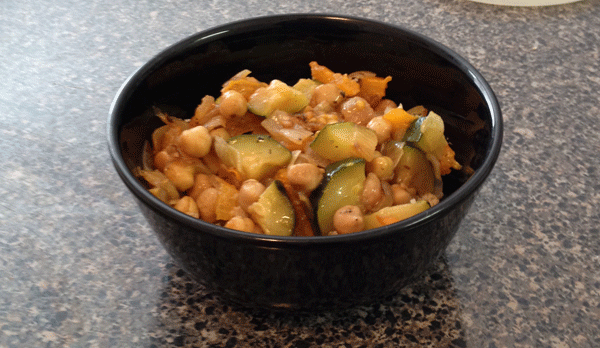
I think this dish would look even better with bright red tomatoes, but what I had on hand was some very tasty orange ones from my CSA.
The weather is continuing to be unbearably hot and so I am continuing to find recipes that cut down on stove time. I saw this recipe for a “Mediterranean Stir Fry” on the back of a can of Garbanzo beans, and it suggested serving the dish over rice. I opted for couscous instead, which takes about 8 minutes to cook rather than 15 to 30.
Stir fries aren’t the ideal hot weather dish – they produce a lot of heat and moisture if you want to get all the vegetables to the right consistency. But my refrigerator was actually a little under-stocked today, so I thought I’d scrounge together something with what I had. This dish took almost no time and it was pretty darn tasty. I opted to not mix in any cheese, but if you’re looking for a more flavorful and slightly less healthy meal, adding some feta cheese would be delicious!
Mediterranean Stir Fry
Serves 4
1 Tbsp olive oil
1-2 cloves garlic, minced
1 medium onion, chopped
1 large zucchini, chopped
1 15 ounce can of garbanzo beans, rinsed and drained
1-2 cups tomato, chopped
Oregano, to taste
1 cup couscous, uncooked
1 and 1/4 cup water
Heat the oil in a skillet over medium heat. Add the garlic and onions and cook covered, stirring occasionally, until the onions are starting to soften. Add the zucchini and the garbanzo beans, and continue to cook covered. After about 10 minutes, once the zucchini is getting tender, put the water in a pot and bring it to a boil. Once it is boiling, stir in the dry couscous, turn off the heat and leave covered for five minutes. Either just before or just after you add the couscous, mix the tomatoes and the oregano in with the other vegetables in the skillet. Serve the vegetables hot over the couscous. Add salt and pepper to taste.
CST Sandwich (Cheese, Spinach and Tomato)
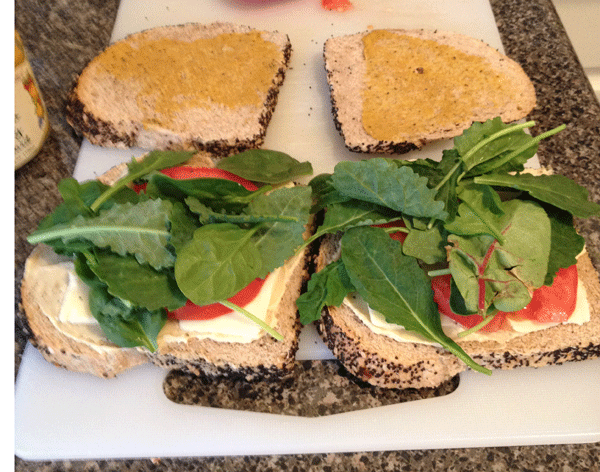
I don’t usually make two sandwiches, but my mom is visiting for a few days and so I’m packing a dinner for her to eat while I’m in class.
People always ask me what I put on sandwich if I don’t put on meat. And when I tell them they act like it’s like not a lot of sandwich. But I find that with good bread (from a bakery and not a grocery store) plus good ingredients I can make no only a filling meal, but a delicious one I look forward too.
So what do I put on my sandwich? The simplest version is cheddar cheese (probably about half an ounce), spinach/lettuce/salad greens, a tomato and some mustard. Sometimes if I don’t have one on hand I even skip the tomato. I know, it really doesn’t sound like much. But with aged Wisconsin cheddar, fresh greens, a thick slice of juicy tomato and a flavorful mustard (my go to is mango curry mustard which I get from the Mustard Museum in Middleton, Wisconsin) it starts to sound pretty mouth-watering. And I can’t stress the importance of good bread. My sandwich tonight is Oregon Herb from the Great Harvest Bread Company which has poppy seeds on the crust and garlic mixed in. It’s hearty and delicious! Of course, if you’ve got the time, homemade bread can be exquisite too! (To be fair, I haven’t had that kind of time in years)
Still doesn’t sound like dinner? Try adding something other than or in addition to mustard that packs a little protein punch like hummus or pesto. Suddenly you’ve got a creation worthy of a clever name in a boutique cafe.
I pack a sandwich for lunch or dinner several times a week. It’s fast. It’s easy. It’s tasty. It’s healthy. It’s cheap. These are all good things.
The other thing I love about sandwiches is this YouTube video (the relevant segment is towards the end, but it all bears watching). Every time I eat a sandwich I get an interna chuckle when I think “sandwiches are for boys.”
Breaking in a New Kitchen

I’d say about 80% of why I picked this apartment was the kitchen. I cannot say enough in favor of clean/new appliances and ample counter space.
I’ve already moved into my first apartment once, but moving from my parents’ house to an apartment in Chicago was a similar experience in that I was starting with NO FOOD in my kitchen. Stocking your pantry in a new kitchen is a daunting process – it’s expensive and it can be hard to think of everything you need at first. As you’re buying item after item, it helps to remind yourself that some of these things get used very slowly and you won’t have to replace them for a long time. Here’s what I needed to buy in order to get my kitchen up and running:
Dry Goods (Flours, grains, pastas, etc.)
Whole wheat pasta (my favorites are rotini and penne)
Brown rice
Quinoa
Couscous
Whole wheat flour
All-purpose flour
Dry roasted almonds
Dried cherries
Kashi Go Lean Crunch
Fiber cereal
Kamut puffs
Canned Goods
Crushed/diced tomatoes (2)
Black beans
Cannellini beans
Kidney beans
Garbanzo beans
Baking Goods
Granulated sugar
Baking powder
Baking soda
Salt
Vanilla
Molasses
Honey
Chocolate chips
Bread
Whole grain bread
Whole wheat tortillas
Whole wheat pitas
Whole grain english muffins
Dairy
Milk
Greek yogurt
Cheddar cheese
Feta cheese
Butter
Eggs
Produce
Garlic
Onions
Carrots
Broccoli
Tomatoes
Spinach
Lettuce
Cabbage
Apples
Watermelon
Condiments and Spices
Ketchup
Mustard
Hummus
Cinnamon
Cumin
Chili Powder
Curry Seasoning
Italian Seasoning
Salt and Pepper
Frozen Foods
Black bean veggie burgers
Edamame beans
Green beans
Non-Food Items
Plastic wrap
Kitchen garbage bags
Sandwich bags
Chip clips
Is this everything you’ll need? Maybe not. Will you need everything on this list? Probably not. But it’s easy to forget about simple things you use everyday when you hit the grocery for the first time in your new kitchen. I wanted to make sure I had everything I needed to make: tomato vegetable soup, a vegetable saute, sandwiches, veggie burgers, pancakes and brownies. Now I know I’m home!
Also make sure to check out this week’s new recipe: Corn and Tomato Salad
Corn and Tomato Salad
We’re having quite the heat wave in Chicago this summer, so I’ve been trying to put together meals that involve minimal kitchen heat. I had this memory of a delicious corn salad I’d made a few years ago, and in my head it didn’t involve using the stove or the oven. But when I went back and found the recipe, it turned out it does involve some light cooking on the stovetop. If you eat this salad right after preparing it, it’ll be a hot salad. But it also keeps wonderfully in the fridge and doesn’t need to be re-heated as it is quite tasty and refreshing when it’s cold.
Corn and tomatoes make a great base for a summer salad. Both of these vegetables are in their prime right now and they’re about as opposite as two vegetables can be. The corn is sweet and crunchy while the tomatoes are soft and slightly acidic. I didn’t have any fresh herbs to season the salad with, so I added a small amount of balsamic vinegar for added flavor. But with some fresh basil or oregano (or other savory herb of your choice), the juiciness of the tomatoes adds enough liquid and acidic flavor such that you don’t even need to add a dressing to this salad.
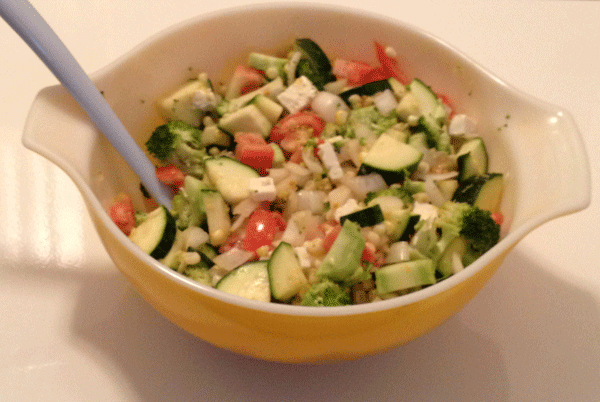
This salad is sweet (from the corn) and spicy (from the onions). The perfect remedy to a hot summer day.
Corn and Tomato Salad
Serves 4 to 6
1 Tbsp olive oil
1 medium onion, chopped (red will add more color to your salad)
About 2 cups broccoli, chopped
1 medium/large zucchini, chopped
1-2 medium tomatoes, cored and chopped
2-3 ears of corn on the cob
1 Tbsp lemon juice
2 0z feta cheese, chopped into cubes
1 Tbsp fresh oregano, minced
Heat the olive oil in a skillet over medium-low heat. Cook the onion until it is just starting to get shiny (side note: normally I’m not a fan of raw onions, but they add nice flavor to this salad. If you like raw onions, you don’t need to cook these onions very long at all).
Add the broccoli and about a 1/3 cup of water and cook covered for a few minutes. Add the zucchini and remove the lid to let the excess water cook off.
At this point, cut the corn off the cob (I like to chop off the bottom of the cob so I can rest it straight on the cutting board and cut in strips around the edge) and add it tot he skillet. Finally add the tomatoes and cook for a minute or two more, stirring regularly.
Transfer the vegetables from the skillet to a mixing bowl and toss with the lemon juice, feta cheese and oregano. Let cool or serve hot.
Kale and Carrot Stew
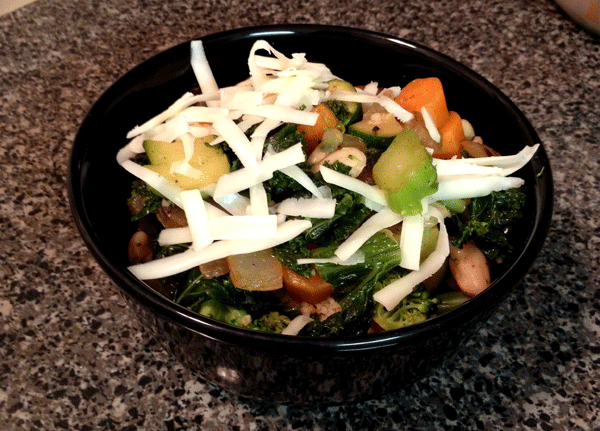
With all the simmering and stewing required to make this dish, I would advise avoiding hot or humid weather unless you want to be a touch uncomfortable in the kitchen.
I signed up for a CSA last week and picked up my first share last Friday. Now with another Friday fast approaching, I had to figure out a quick (and still tasty) way to use up a lot of the vegetables I’d gotten in my first share. This is the blessing and the curse of food shares – it forces you to eat a lot of vegetables.
What I came up with has a lot more than kale and carrots in it (but liked the alliteration of these two together…plus, it reminded me of “hale and hearty,” so I thought it was a good fit). In my food share last week I got lettuce, cabbage, cucumber, zucchini, carrots, kale, an onion and some assorted fruit. This stew made use of the zucchini, carrots and kale, plus some broccoli I’d bought at the store last week. All in all I thought my “everything in the refrigerator” stew turned out pretty good. Served over couscous (which is such a breeze to cook. I had no idea!) with a little cheese, it was definitely a satisfying meal.
Kale and Carrot Stew
Serves 4-6
*The amounts for the vegetables listed below are very flexible. Chop until it looks like enough of until you don’t feel like chopping anymore
2-3 tsp canola oil
1 large onion, chopped
1 clove garlic, minced
1/2 tsp cumin
1/2 tsp chili powder or cayenne pepper (something with heat)
1 1/2 cups water
1/4-1/2 tsp salt
2 cups carrots, chopped into coins (or half coins if they are too wide)
2 cups kale, chopped
2 cups broccoli, chopped
1-2 cups zucchini, chopped
1 15-0z can of cannellini beans
1 cup uncooked whole wheat couscous
1-2 oz cheddar cheese, grated
Heat the canola oil in a large skillet over medium heat. After a minute, add the onions, stirring occasionally until they start to soften. Add the garlic and the spices and stir occasionally until they are starting to get browned and aromatic (this is good time to chop the vegetables).
First, add the carrots and the water to the skillet and cook covered while you prep the next vegetables. When I chop kale, I like to cut it into strips and then haphazardly cut lengthwise along the pile of strips. This usually breaks it up into bite-sized pieces. Add the kale, broccoli and zucchini (you can stop to chop the next vegetable after you add one, the timing here is flexible). Cook covered for a few minutes until the carrots are just starting to get tender. Then remove the cover and lower the heat to allow some of the excess water to cook off. At this point, drain and rinse the cannellini beans and stir them in with the rest of the vegetables.
While the stew simmers, bring 1 1/4 cups water with a pinch of salt to a boil in a covered saucepan. Once the water is boiling, add the 1 cup of dry couscous, stir quickly and remove from the heat. Place the cover back on the saucepan and let sit for 5 minutes.
Once the couscous is ready, the vegetables should be to (test one or two for doneness. If there’s a lot of excess water, you can pour it off carefully through a slotted spoon). Serve the vegetables over about 1/2 cup of couscous and top with just a little cheese.
Foraging For Food
There are a lot of things that can make moving to a new city difficulty – and figuring out where you’re going to get your food is a biggie. There are a lot of ways in which I was food-spoiled in Madison (probably the biggest being I lived with my parents so my mom did the bulk of the grocery shopping and food prep while I was in her kitchen). Madison is a great town for local food. Lots of small farms are getting big names around Madison and they sell their wares at the year-round, weekly (twice weekly in the summer) Dane County Farmers’ Market. I’ve been going to the Market for years now and so I have my favorite vendors – the place where I get my German Butterball potatoes or my 6-year aged cheddar cheese or my cherry tomatoes and mini cucumbers. It’s a huge market and everything sold there was grown or produced by the people selling it – it’s all local. On top of this fabulous resource, Madison has some great food cooperatives with a strong emphasis on finding local produce when it’s in season.
So I was understandably a little intimidated and worried when I moved to Chicago. My first stop for groceries was the Dominick’s two blocks from my house. For those of you not in the area, Dominick’s is one of your pretty standard big box chain grocery stores in the Chicago area. And it had a pretty dismal selection of organic foods and next to no local produce. I was a little disheartened, but I continued my quest by taking the L two stops further south to the Jewel Osco (another big chain store in the area and the one where my family did much of our shopping when I grew up in the north Chicago suburbs). The Jewel was a little more promising. About half an aisle is dedicated to organic and natural foods, so it’s easy to find things like recycled toilet paper and organic, fair trade sugar. They also sell organic yogurt, butter and local milk that comes in glass bottles that you return to the store. It’s still a long way from meeting my local foodie needs, but it’s definitely a one-stop shop option if I’m in a hurry.
Luckily for me, across the street from my Dominick’s is a small, unassuming food cooperative! The inside of True Nature Foods isn’t much to write home about. But they have a great selection of produce and other cooking/baking essentials. Plus they are the site of a weekly summer farmer’s market and a CSA pickup. So less than a week after I’d moved to the big city, I’d already picked up my first share of a CSA complete with cucumbers, cherry tomatoes, cabbage, carrots and more. The CSA also included a small selection of non-local fruit (I’m assuming non-local, unless Illinoisans have developed a way to grow bananas). Thus far I feel pretty happy with my shopping options. Although I’m still on the lookout for some good quality cheese and cottage cheese (again, I’m spoiled by having lived in the Dairy State for so long now).
I also want to do a little research for my own edification into how food gets into Chicago. With a city this big, it’s hard for food to be grown locally. With so many mouths to feed, trucks have to pour into the cities from all over to meet people’s food needs. I’ll do a little digging into how Chicago fares in terms of sustainability and share my findings with you in a future post.
If you’re looking for local food options in your area, this web site seems to have a pretty comprehensive breakdown of what’s near me. Maybe it can help you out too!
Hummus Wrap
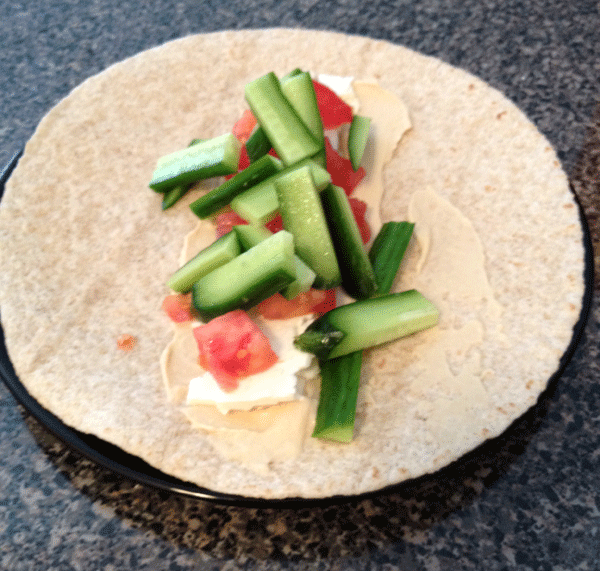
You can get away with filling this wrap slightly more full. But you don’t want to overdo it because that will only make it a big mess to eat.
It seems that I’ve moved to Chicago in the middle of a heat wave. Which has meant two things in terms of cooking in my new kitchen. One, it’s really hard to get motivated to go out and find sources for all the kitchen goods I need to be able to bake/cook/prepare whatever I want. And two, it is two hot to use the oven or the stove. I just started taking night courses for a Masters in Public Health program at Northwestern University’s Chicago Campus, so I’ll be packing a sandwich for dinner. But for lunch I wanted something quick and cool. Here’s what I came up with, and some suggestions for ways to change it up or make it even tastier. Keep an eye out for a post or two about setting up your kitchen in a new apartment and finding good food sources in a new city.
Hummus Wrap
Makes 1
Small/medium-sized whole wheat tortilla
Hummus, any variety (I used Garlic Lover’s)
Feta cheese, thinly sliced
1 slice of tomato, chopped into strips or diced into small pieces
1/4 cup cucumber, chopped
Spread a spoonful or two of hummus down the middle of the tortilla. Place the feta cheese on top of the hummus and the vegetables on top of that. Fold one side of the tortilla over the middle and put a dab of hummus on the top side of it. Fold the other side on top of the hummus dab (this helps hold the wrap shut).
You can substitute any vegetables you want. Sliced avocado is good and adds a creamy texture that mellows out the salty feta cheese. Sprouts add nice bulk and texture. Grated carrots work too. Basically, if it sounds good to you and you can still fold the wrap closed, you’re good to go. If you’re looking for a no-bake meal on summer’s hottest days, this wrap is the way to go!
Strawberry Muffins

These strawberry-laden muffins are the perfect treat for a cool summer morning (as rare as those are).
Strawberry season in Wisconsin is pretty dismal this year. Apparently, our warm winter allowed some sort of bug that usually can’t survive this far north to get into the strawberry crop, which means far fewer strawberries than one usually gets in late spring/early summer. I’m not even sure if I’ll be able to go have a U-Pick day with my mom. But we have gotten a few quarts of strawberries form our favorite local farm and it’s no surprise that they’re delicious.
These whole wheat muffins are especially sweet and moist with fresh strawberries, but you can use frozen (either your own put-up strawberries, or frozen from the store). They come together pretty quickly too – the longest step is chopping the strawberries. If you’re looking for a healthy treat to celebrate the strawberry season (and I’m hoping that yours is better this year than mine is shaping up to be), try out these whole wheat muffins!
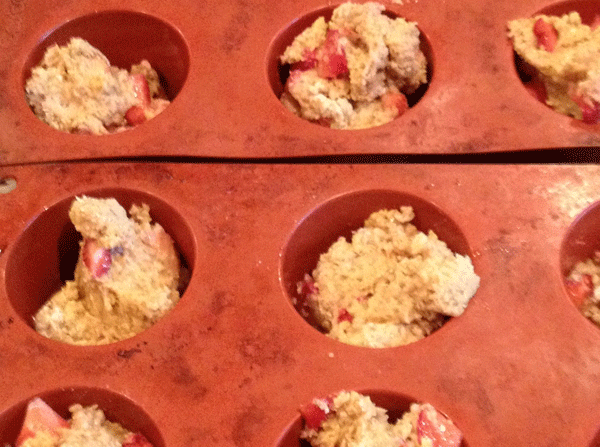
This batter seems pretty dry once it’s al mixed together. But don’t add any extra liquid! This will come from the strawberry juices released during the baking process.
Strawberry Muffins
Makes 12 Muffins
1 and 3/4 cups whole wheat flour
3/4 cup sugar
1 teaspoon baking soda
1/4 teaspoon ground nutmeg
2 eggs, lightly beaten
1/2 cup fat-free plain yogurt
1/4 cup butter, melted and cooled
1 teaspoon vanilla extract
1 and 1/4 cups coarsely chopped strawberries
Granulated sugar, for topping (optional)
Preheat the oven to 375 F. Mix together the dry ingredients (flour, sugar, baking soda and nutmeg) in a medium/large bowl. In another bowl, mix together the eggs, yogurt, butter and vanilla.
Stir the liquid mixture into the dry ingredients, mixing just until the batter is moist (you don’t want to over-mix the batter, since this will make the muffins tough and hard). Gently fold in the strawberries. The batter will seem quite dry, but this is because more moisture will be released from the strawberries as they bake.
Distribute the batter evenly into muffin cups coated with a little bit of canola oil. You should have enough batter to fill the cups about 2/3 full. If you have any large-crystal/granulated sugar, top each muffin with a sprinkle of this sugar for an extra treat.
Bake the muffins for about 15-20 minutes. To test whether or not the muffins are done, insert a toothpick into the middle of one of the muffins. If the toothpick comes out clean (no batter or crumbs), then the muffins are done. Cool the muffins in the cups for about 5 minutes and then remove them from the pan/tin to cool on a rack.